
Lime Plaster and Decorative Plasterwork
A conservation guide to historic internal and external plaster — how it works, why it fails, when to repair, and why gypsum and cement repairs cause more damage than they solve.
In summary
Historic plaster is a soft, permeable, sacrificial material, and it fails when repaired with harder, less permeable modern materials that trap moisture and transfer stress into the surrounding fabric. Lime plaster on masonry, and lime plaster on riven timber lath, remain repairable long after they appear beyond saving; loose plaster can frequently be reattached rather than replaced. Wholesale stripping of historic plaster is a substantial loss — it removes decorative schemes, historic surfaces, evidence of the building’s development, and in the case of lath and plaster the historic lath as well. On listed buildings, removal of historic plaster and its replacement in gypsum or cement-based materials normally requires consent and is frequently refused.
On this page
- Why plaster matters more than it looks
- How historic plaster is made up
- Lime, gypsum and cement — the material distinction
- External render
- How historic plaster fails
- Diagnosis before repair
- Repairing plain plaster
- Repairing lath and plaster ceilings
- Decorative plasterwork
- Insulation, retrofit and the plaster question
- Consent position
- Specification and procurement
- Curing, drying and programme
- Common mistakes
- Find a specialist
- Frequently asked questions
Why plaster matters more than it looks
Plaster reads as a surface finish and is treated as consumable. In a historic building it is neither.
Historic plaster carries:
- Decorative schemes — early paint layers, distemper, wallpaper fragments, stencilling and painted decoration, sometimes concealed under later coats
- Evidence of the building’s development — blocked openings, former partition scars, changes in level, phasing
- Original surfaces — hand-applied, slightly undulating, catching light in a way flat modern board cannot reproduce
- Historic lath, riven by hand, which is itself a diminishing resource
- Functional performance — permeability that lets a solid wall manage moisture
Stripping it removes all of that at once, and the loss is invisible in a photograph, which is why it happens so easily.
How historic plaster is made up
On masonry
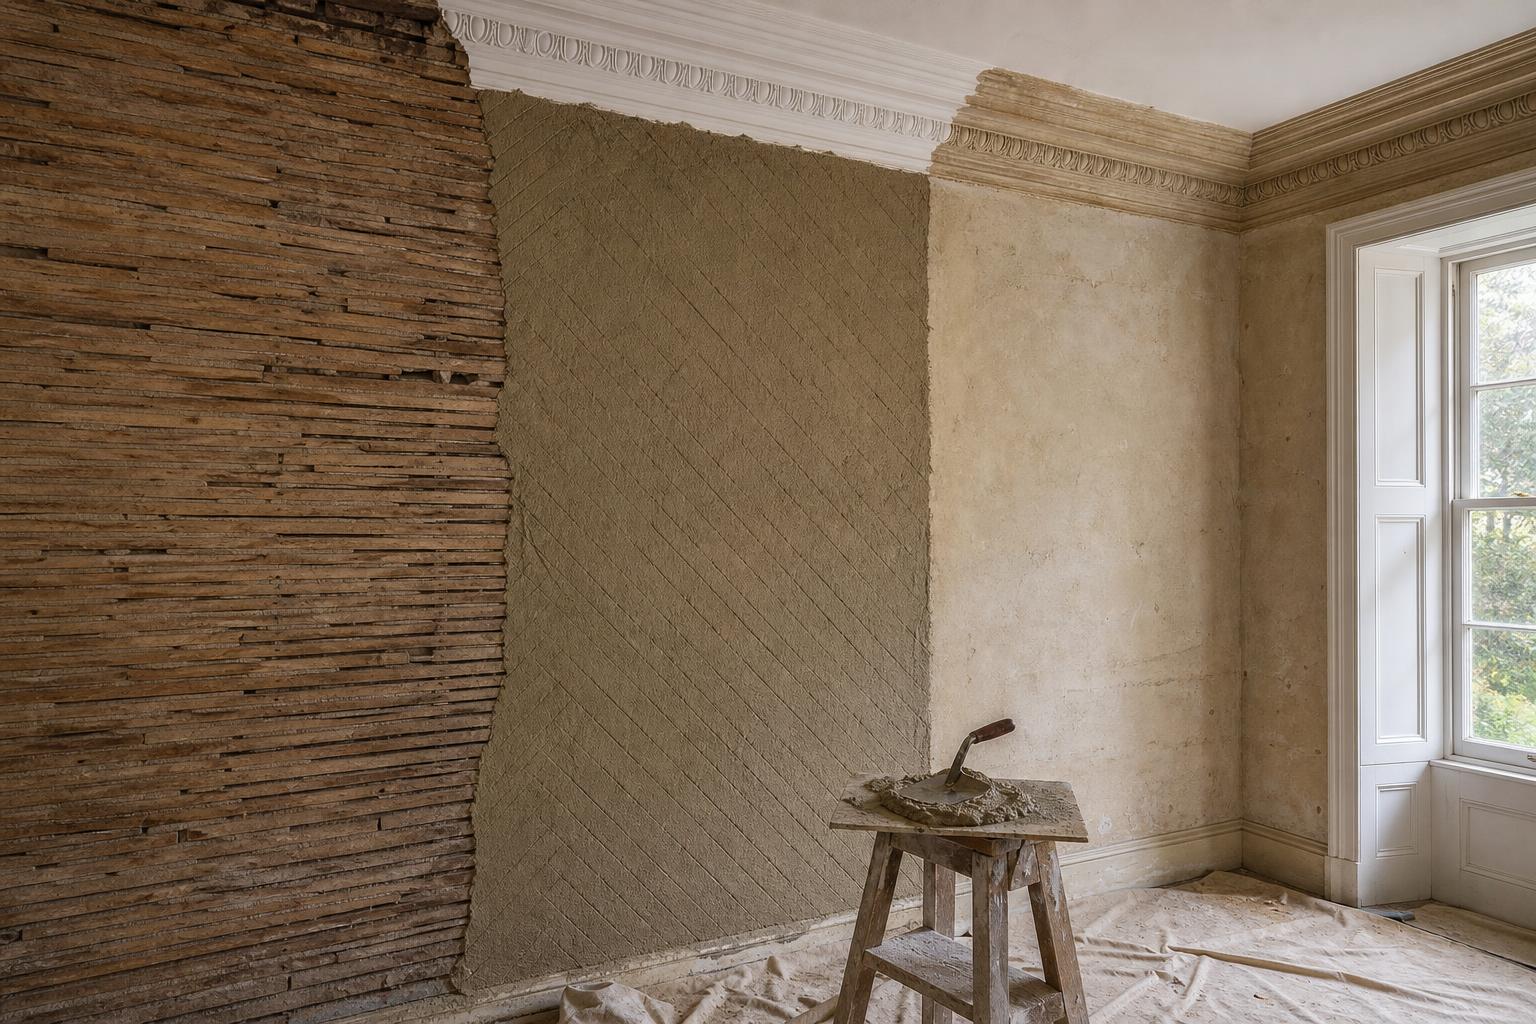
Typically two or three coats: a coarse base coat pushed into the joints to key, one or more intermediate coats, and a fine finish coat. Aggregate is normally well-graded sand, sometimes with animal hair in the base coats for tensile reinforcement.
On lath
Riven timber laths, nailed with gaps between, with the base coat pushed through to form nibs on the far side. Those nibs are what hold the ceiling up — not adhesion to the lath face. Understanding this is central to ceiling repair, because the failure mode is loss of nibs, and the repair addresses the nibs.
Finishes
Fine lime finishes, sometimes gauged, sometimes burnished. Historic finishes are generally thinner, harder-wearing and considerably more subtle than modern skim.
Lime, gypsum and cement — the material distinction
This distinction underpins everything else.
Lime is soft, permeable, and slightly flexible. It accommodates movement by distributing fine cracking rather than concentrating stress. It allows moisture to move through and evaporate. It is, crucially, sacrificial — it is intended to decay before the fabric behind it does.
Gypsum is harder and considerably less permeable than lime. It is also vulnerable to sustained damp: gypsum plaster in a wet wall breaks down. Gypsum has a long history in historic buildings for fine decorative work and some internal finishes, so it is not simply “modern” — but gypsum-based board and skim as a general repair for lime plaster on a damp solid wall is a mismatch.
Cement is hard, strong and effectively impermeable. Used as a repair or render on a soft historic wall, it traps moisture behind it, concentrates stress at its edges, and where it fails it takes the face of the masonry with it. Cement render on a solid wall is one of the most damaging interventions commonly found on historic buildings.
The principle. Repair materials should be no harder and no less permeable than the original. Where they are, the historic fabric absorbs the stress and the moisture instead, and the damage moves from the sacrificial layer into the structure.
External render
Lime render on a solid wall works as part of a system: it sheds most water, absorbs some, and releases it by evaporation. Limewash over it is the sacrificial outer layer, renewed periodically.
Common problems:
- Cement render over solid walls, trapping moisture and causing damp internally, decay in embedded timbers, and spalling of the masonry face
- Impermeable masonry paint over lime render, producing the same effect
- Cracking and hollowness, indicating loss of key
- Failure at junctions — plinths, cills, string courses, verges — where water is directed behind the render
Where cement render is being removed, expect the wall behind to be wetter than anticipated, and allow drying time before rendering in lime. This routinely extends programmes and should be planned for rather than discovered.
How historic plaster fails
Loss of key. On masonry, the base coat separates from the wall. On lath, the nibs break. In both cases the plaster becomes detached but often remains largely intact — it is loose, not destroyed. This distinction is the single most important one in plaster repair.
Water ingress. Roof or gutter failure above, penetrating damp, plumbing leaks. Sustained wetting breaks down the plaster and, in the case of lath and plaster, rots the lath and the fixings.
Structural movement. Cracking following the pattern of movement in the structure. The plaster is reporting a problem, not causing one.
Overloading. Ceilings loaded from above by stored material or by insulation laid heavily on the laths.
Vibration and impact. Adjacent works, particularly drilling and hammering, which break nibs across a wide area.
Previous repair. Hard patches in gypsum or cement, which crack at their edges and shed the adjoining historic plaster with them.
Nail failure. Corrosion of the nails holding lath to joist, which is a slow progressive failure often unnoticed until a section drops.
Diagnosis before repair
Establish why the plaster failed before deciding what to do about it. Replacing plaster that failed because of a roof leak, without fixing the roof, guarantees the same outcome twice.
The sequence:
Fix the water first. Roof, gutters, downpipes, ground levels, plumbing. Nothing else should proceed until water ingress is stopped and the fabric has begun to dry.
Map what is loose. Tap-test methodically across the whole surface. Record hollowness on a drawing. Hollow does not mean lost — much of it can be reattached.
Look for decorative schemes. Before any stripping, check for early paint, distemper, wallpaper and painted decoration. Where anything is found, stop and take advice. Paint research can establish the sequence and significance.
Assess the lath. From above where possible. Sound lath with broken nibs is a reattachment job. Rotted lath and corroded fixings are a different proposition.
Understand the cracking. Fine crazing is normal in lime. Directional cracking that follows structural lines needs a structural assessment before plaster repair, or the repair will simply crack again.
Record. Photograph before disturbance, including ceilings from below and above.
Repairing plain plaster
Reattachment before replacement. Where plaster is sound but detached, conservation grouting can reattach it. Consolidating grouts injected behind the plaster in controlled quantities, with the plaster temporarily supported, will recover large areas that would otherwise be stripped. This is a specialist technique and it is far less well known among general contractors than it should be.
Where replacement is genuinely required:
- Cut back to sound plaster, with a clean edge, not a feathered one
- Match the mix — binder, aggregate grading, hair content — to the original. Analysis of the original is inexpensive and takes the guesswork out
- Match the number of coats and total thickness, so the new work sits flush and behaves the same
- Match the surface texture. Historic plaster is not perfectly flat. A dead flat patch in a lime wall reads as a repair from across the room
- Key properly to the masonry, raking joints where required
- Protect and control drying. See Part 13
Repairing lath and plaster ceilings
Ceilings are where the greatest losses occur, because a partially failed ceiling looks alarming and the instinctive response is to take it all down.
Options, in order of conservation preference:
- Reattachment from above. Where the ceiling void is accessible, adhesive can be introduced to reform the connection between plaster and lath. Debris must first be carefully removed from between the joists — it is often decades of accumulated dust and rubble adding load.
- Grouting and consolidation from below, with temporary support.
- Secondary support from above — introducing new support that carries the ceiling without removing it, allowing the historic plaster and lath to be retained in place.
- Localised replacement in matching materials, retaining the surrounding historic ceiling.
- Full replacement, only where the ceiling is genuinely beyond retention.
Where a decorative ceiling is involved, none of the above should proceed without specialist advice.
On insulation in ceiling voids. Laying insulation directly onto lath and plaster adds load to a system designed to carry only its own weight, and can prevent the void from drying. Where insulation is proposed above a historic ceiling, the loading and moisture implications need considering explicitly.
Decorative plasterwork
Cornices, ceiling roses, enrichments, friezes, panel mouldings and modelled work.
Run work was formed in situ using a profiled zinc template drawn along the work. It can be re-run in situ using a template taken from the surviving profile.
Cast work — enrichments, roses, applied ornament — was cast in moulds. Missing elements can be recast from moulds taken off surviving originals, which is why retaining even one good example matters enormously.
Modelled work was worked by hand and requires a modeller to replicate.
Practical points:
- Take moulds before removing anything. A single surviving enrichment allows the whole run to be replicated. Lose it, and replication becomes conjecture.
- Paint build-up is a real problem on decorative plaster. Successive coats progressively obliterate crisp detail. Careful removal can recover it, but this is delicate work and is easy to do damage with.
- Do not use decorative plaster to conceal structural problems. Cracked cornices frequently indicate movement.
- Fibrous plaster — plaster reinforced with hessian on a timber frame, from the later nineteenth century — is a distinct material with its own failure modes, particularly corrosion of wire hangers in suspended ceilings. In auditoria and large spaces this is a life-safety matter and needs specialist inspection.
Insulation, retrofit and the plaster question
Retrofit proposals routinely involve removing internal plaster to fit insulation. This deserves careful thought.
The issues:
- Removing historic plaster to insulate destroys the decorative and evidential material described in Part 1, irreversibly
- Internal wall insulation on a solid wall changes the moisture and temperature profile of the wall. The masonry runs colder and wetter, embedded timbers — wall plates, bressummers, joist ends, bonding timbers — sit in the colder zone, and the risk of interstitial condensation and decay rises
- Vapour-closed systems on solid walls are particularly risky where the wall was designed to breathe
- Consent is normally required on a listed building, and removal of historic plaster for insulation is frequently refused
Where thermal improvement is the objective, the sequence that does least harm is: fix the water first, then draughtproof, then insulate the roof, then look at floors, and treat solid wall insulation as a last resort requiring proper assessment including condensation risk analysis.
Where insulation over historic plaster is genuinely justified, breathable systems applied over the retained plaster are preferable to stripping — though they still alter the wall’s behaviour and still need assessment.
Consent position
On a listed building, removal of historic plaster normally requires Listed Building Consent, and replacement in gypsum or cement-based materials is frequently refused.
Points that recur:
- Historic plaster is historic fabric. Removing it is alteration, not maintenance.
- Removing plaster to install insulation or to allow damp treatment is a common application and a commonly refused one.
- Re-plastering in matching lime is generally supported; re-plastering in gypsum board and skim generally is not.
- External render in lime, replacing failed cement, is normally welcomed.
- Where decorative plasterwork is affected, expect the authority to require detailed drawings and a specialist method statement.
- Injected damp-proofing works involving plaster removal are frequently resisted, and many conservation officers will want to see that the cause of the damp was investigated first.
The broader framework is covered in Listed Building Consent: What Needs It, What Does Not.
Specification and procurement
State:
- A survey drawing showing sound, hollow and lost areas
- Mix specification — binder type, aggregate grading, hair, proportions, by coat — ideally informed by analysis of the original
- Number of coats and total thickness
- Surface texture and finish, described, with a sample panel requirement
- Reattachment before replacement, stated as the default, with the extent of replacement defined
- Mould-taking requirement for decorative work before any removal
- Requirement to check for and report decorative schemes before stripping, with a stop-and-notify clause
- Protection of retained work
- Drying and curing regime, including protection from frost, sun, wind and premature heating
- Programme allowance for carbonation and drying
- A prohibition on cement and gypsum where lime is specified — stated explicitly, because substitution happens
- A contingency for concealed loss
Require a sample panel, approved before general work. Lime plaster varies with mix, aggregate, application and finishing, and the sample is the only way to agree what “matching” means.
Curing, drying and programme
Lime work fails when it is rushed, and programme pressure is the commonest cause of poor lime plastering.
- Lime needs time. Carbonation is slow, and each coat must be sufficiently set before the next is applied.
- Protect from drying too fast. Sun, wind and heaters cause shrinkage cracking and a weak, dusty surface. Damp hessian, sheeting and controlled ventilation are normal practice.
- Protect from frost. Lime work damaged by frost before it has set will not recover.
- Do not turn the heating on to speed things up. This is the single most common cause of failure in refurbishment projects.
- Allow drying before decoration, and decorate with a permeable finish. Sealing damp lime with an impermeable paint traps moisture and causes the decoration to fail.
- Seasonal constraints are real. External lime work has a working season, and a programme that puts render on in midwinter is a programme that will produce defects.
Common mistakes
| Mistake | Consequence |
|---|---|
| Stripping plaster before checking for decorative schemes | Irreversible loss of painted decoration and historic finishes |
| Assuming hollow plaster must come down | Large areas lost that could have been reattached |
| Patching lime with gypsum or cement | Cracking at edges; adjoining historic plaster shed with the patch |
| Cement render on solid walls | Trapped moisture, internal damp, decayed timbers, spalled masonry |
| Re-plastering before fixing the water | Same failure repeats |
| Insulating over lath and plaster without assessment | Overloading; trapped moisture; decay in the void |
| Removing plaster to insulate | Substantial loss of historic fabric; commonly refused |
| Turning the heating on to speed drying | Shrinkage cracking, weak dusty surfaces |
| Lime work in frost | Permanent damage; work must be redone |
| Discarding a surviving enrichment | Replication becomes conjecture |
| No sample panel | “Matching” undefined; disputes on site |
| Impermeable paint over new lime | Trapped moisture; decoration fails |
Find a specialist
The Building Restoration Index lists vetted specialists in historic plaster:
- Plasterwork — lime plastering and decorative plasterwork
- Lime Mortars and Plaster — lime specialists and suppliers
- Mortars and Renders — external render and pointing
- Interior Consultants and Conservators — historic interiors and decorative schemes
- Paint Research — analysis of historic decorative schemes
- Materials Analysts — mortar and plaster analysis
- Damp and Timber Decay — diagnosis of the underlying cause
- Structural Repairs and Stabilisation — where cracking indicates movement
- Architects and Heritage Consultants — significance and consent
Related guides in the library: Historic brickwork, Damp in historic buildings, Historic stonework. The full set is on the Technical Library page of the Building Restoration Index.
Frequently asked questions
Can hollow-sounding plaster be saved?
Frequently, yes. Conservation grouting and reattachment techniques recover large areas that would otherwise be stripped. Hollow means detached, not destroyed.
Why can’t I patch lime plaster with gypsum or cement?
They are harder and less permeable. They crack at their edges, shed the adjoining historic plaster, and trap moisture in the wall behind.
Is gypsum plaster always wrong in a historic building?
No — gypsum has a long history in fine decorative work. But gypsum board and skim as a general repair for lime on a damp solid wall is a mismatch.
Why is cement render a problem on old walls?
It traps moisture behind an impermeable layer, causing internal damp, decay in embedded timbers, and spalling of the masonry face when it fails.
Should I remove cement render?
Usually yes, on a solid wall, replacing it with lime. Expect the wall to be wetter than anticipated and allow drying time.
Do I need consent to remove plaster in a listed building?
Normally yes. Historic plaster is historic fabric, and removal is alteration rather than maintenance.
My ceiling is sagging. Does it all have to come down?
Not necessarily. Reattachment from above, grouting, and secondary support can retain historic ceilings that look beyond saving. Take specialist advice before stripping.
Can I lay insulation over a lath and plaster ceiling?
Only after considering the loading and the moisture implications. Lath and plaster was not designed to carry additional load, and insulation can prevent the void drying.
Can missing cornice be replicated?
Yes. Run work can be re-run in situ from a template taken off the surviving profile, and cast enrichments can be recast from moulds off originals. Retain at least one good example.
Why does my new lime plaster keep cracking?
Usually drying too fast — sun, wind or heaters. Lime needs protection and time.
How long does lime plaster take to dry?
Considerably longer than gypsum, and it varies with thickness, mix and conditions. Build the time into the programme rather than forcing it.
Can I paint new lime plaster with ordinary emulsion?
Not advisable. Use a permeable finish. Impermeable paint traps moisture and the decoration fails.
What should I do about damp before re-plastering?
Find and fix the cause first — roof, gutters, ground levels, plumbing. Re-plastering a wet wall repeats the failure.
Is injected damp-proofing appropriate?
It is frequently resisted on listed buildings, and many conservation officers will want evidence that the cause of the damp was investigated first.
What is fibrous plaster and why does it matter?
Plaster reinforced with hessian on a timber frame, from the later nineteenth century. Corrosion of wire hangers in suspended ceilings is a life-safety issue requiring specialist inspection.
How do I know what the original mix was?
Analysis of a sample. It is inexpensive and removes the guesswork from matching.