
A specifier’s guide to bracket centres, set-out, falls and fixing types for cast iron gutters and downpipes on listed and historic buildings — with worked bracket counts, drawings and the common mistakes we see on site.
Technical summary
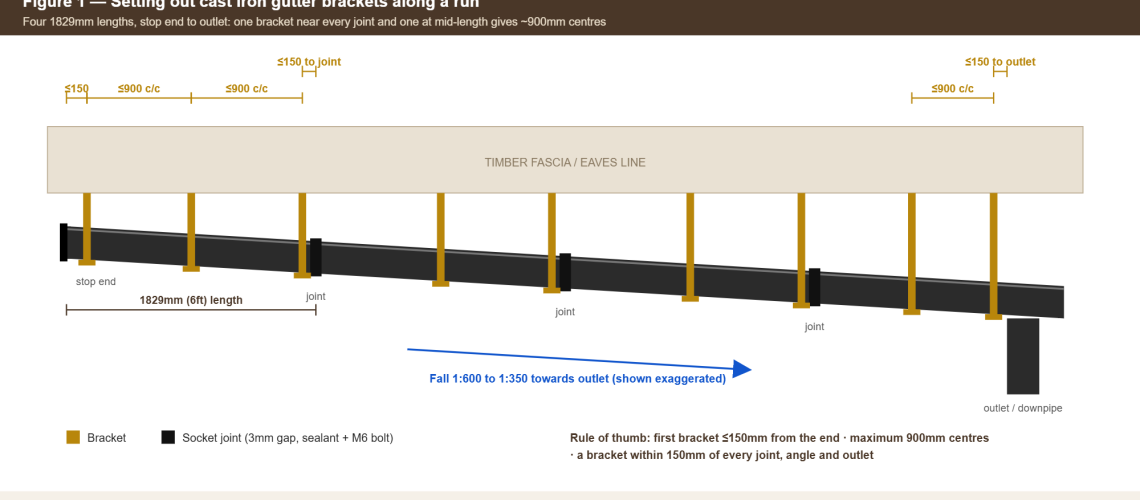
Cast iron gutter brackets should be set at a maximum of 900mm centres, with the first bracket no more than 150mm from a stop end and an additional bracket within 150mm of every joint, angle and outlet. On standard 1829mm (6ft) lengths this works out at two brackets per length plus one, or roughly 1.1–1.2 brackets per metre of straight run. Gutters are set to a fall of between 1:600 and 1:350 towards the outlet. The bracket type follows the eaves: fascia brackets where there is a sound fascia, top- or side-fix rafter brackets where rafter feet are available, and drive-in brackets into masonry where neither exists. Rise and fall versions allow the fall to be set accurately on uneven historic eaves. Downpipes take one fixing at every socket — about 1.83m centres, never more than 2m.
Contents
Few details on a period building are as quietly consequential as the spacing of its gutter brackets. The short answer is that cast iron gutter brackets should be fixed at no more than 900mm centres, with the first bracket within 150mm of the end of the run and a further bracket within 150mm of every joint, angle and outlet, and the gutter set to a fall of 1:600 to 1:350 towards the outlet. Get those four things right and a cast iron system will run true for generations; get them wrong and even the finest casting will sag, leak at its joints and discharge water onto the wall it was meant to protect.
We write this guide for architects, conservation officers, surveyors and heritage contractors who need firm figures rather than rules of thumb. Manufacturers’ literature is surprisingly thin on the subject, and much of what is published online stops at describing bracket types without saying how many are needed or where they belong. Below we set out the centres, the set-out sequence, a worked method for counting brackets, the right bracket for each kind of eaves, and how downpipes should be fixed — drawing on published installation guidance and on many years of supplying cast iron guttering to listed and historic buildings.
Cast iron gutter brackets should be no more than 900mm apart, measured centre to centre along the line of fall. Published manufacturer guidance converges on this figure: the major British cast iron systems quote 900mm or 915mm (3ft) centres, and the slightly lower 900mm is the safer specification figure.
The 915mm figure is not arbitrary. Traditional cast iron gutters are made in 1829mm (6ft) lengths, so a bracket close to each joint and another at mid-length produces centres of almost exactly 915mm. That pattern has been used on British eaves since the Victorian period, and it remains the most practical way to set out a run today: the joints are never cantilevered, and every length is carried at three points.
Closer centres are justified in a number of situations, and we would always rather see a bracket too many than one too few:
To put the loads in context, a 125mm half round gutter filled to the brim holds roughly six litres of water per metre — about six kilograms per metre before the weight of the casting itself, accumulated silt, or a build-up of ice. Cast iron is strong in compression but brittle under bending and impact, so long unsupported spans are precisely the condition it handles worst.
The first bracket should sit within 150mm of the end of the run, and published guidance from the principal UK cast iron manufacturer puts it even closer, at 75–100mm. The last bracket should likewise sit within 150mm of the stop end or outlet. An end that is left overhanging will deflect under load, open the joint behind it and allow water to track back along the soffit.
The key positions on any run are therefore:
Set out the fixed positions first, then infill. Working the other way round — starting at one end and stepping along at 900mm — almost always leaves a joint or an outlet unsupported somewhere along the run.
For a straight run set out on standard 1829mm lengths, you need two brackets per length plus one, then one extra bracket for each angle and two for each running outlet. That gives a figure of roughly 1.1 to 1.2 brackets per metre on a typical straight run, rising on exposed sites or complex roofs.
The table below gives typical bracket counts for straight runs with a stop end at one end and a drop end outlet at the other. The final column shows the count at tighter centres for exposed or snow-prone sites.
| Run length | 1829mm gutter lengths | Brackets at 900mm max centres | Typical count (joint-led set-out) | Exposed site (~650mm centres) |
|---|---|---|---|---|
| 3m | 2 | 4 | 5 | 6 |
| 6m | 4 | 8 | 9 | 10 |
| 9m | 5 | 11 | 11 | 15 |
| 12m | 7 | 14 | 15 | 19 |
| 15m | 9 | 18 | 19 | 24 |
Add one bracket per angle and two per running outlet. Counts assume a stop end at one end and an outlet at the other; round up, never down.
As an example, a 12m front elevation with a central running outlet and a 90° return at each end would need about 15 brackets for the straight run, two more at the outlet and two at the angles — 19 in total. Ordering a few spare brackets is sensible on any historic building, where an unexpectedly rotten rafter foot or a hard stone where a joint was expected can force an extra position.
A cast iron gutter should fall between 1:600 and 1:350 towards its outlet — that is, between 1.7mm and 2.9mm per metre. A slight fall clears silt and standing water; too steep a fall drops the low end of the gutter away from the roof edge, so that water overshoots it in heavy rain.
| Run length to outlet | Drop at 1:600 | Drop at 1:350 | Practical target |
|---|---|---|---|
| 3m | 5mm | 9mm | 5–9mm |
| 6m | 10mm | 17mm | 10–17mm |
| 9m | 15mm | 26mm | 15–26mm |
| 12m | 20mm | 34mm | 20–34mm |
Keep the high end as close to the roof edge as practical, and the low end no more than about 50mm below it. Very long runs are better served by an extra outlet than by a steeper fall.
Set the fall with a string line stretched between the first and last brackets, then fix the intermediate brackets to the line. Where the eaves are too uneven to allow a consistent fall, or where the fall cannot be achieved at all, a level gutter is acceptable provided it is well maintained — far better than a gutter with a hump or a dip in it. The bracket should also be set so that the roof covering discharges into the middle of the gutter rather than its back edge; installation guides suggest roughly 5mm clearance beneath the last course of slates or tiles. Calculating levels and positioning outlets are covered in depth in our specifier’s guide to cast iron gutter fall, outlet positions and fixing.
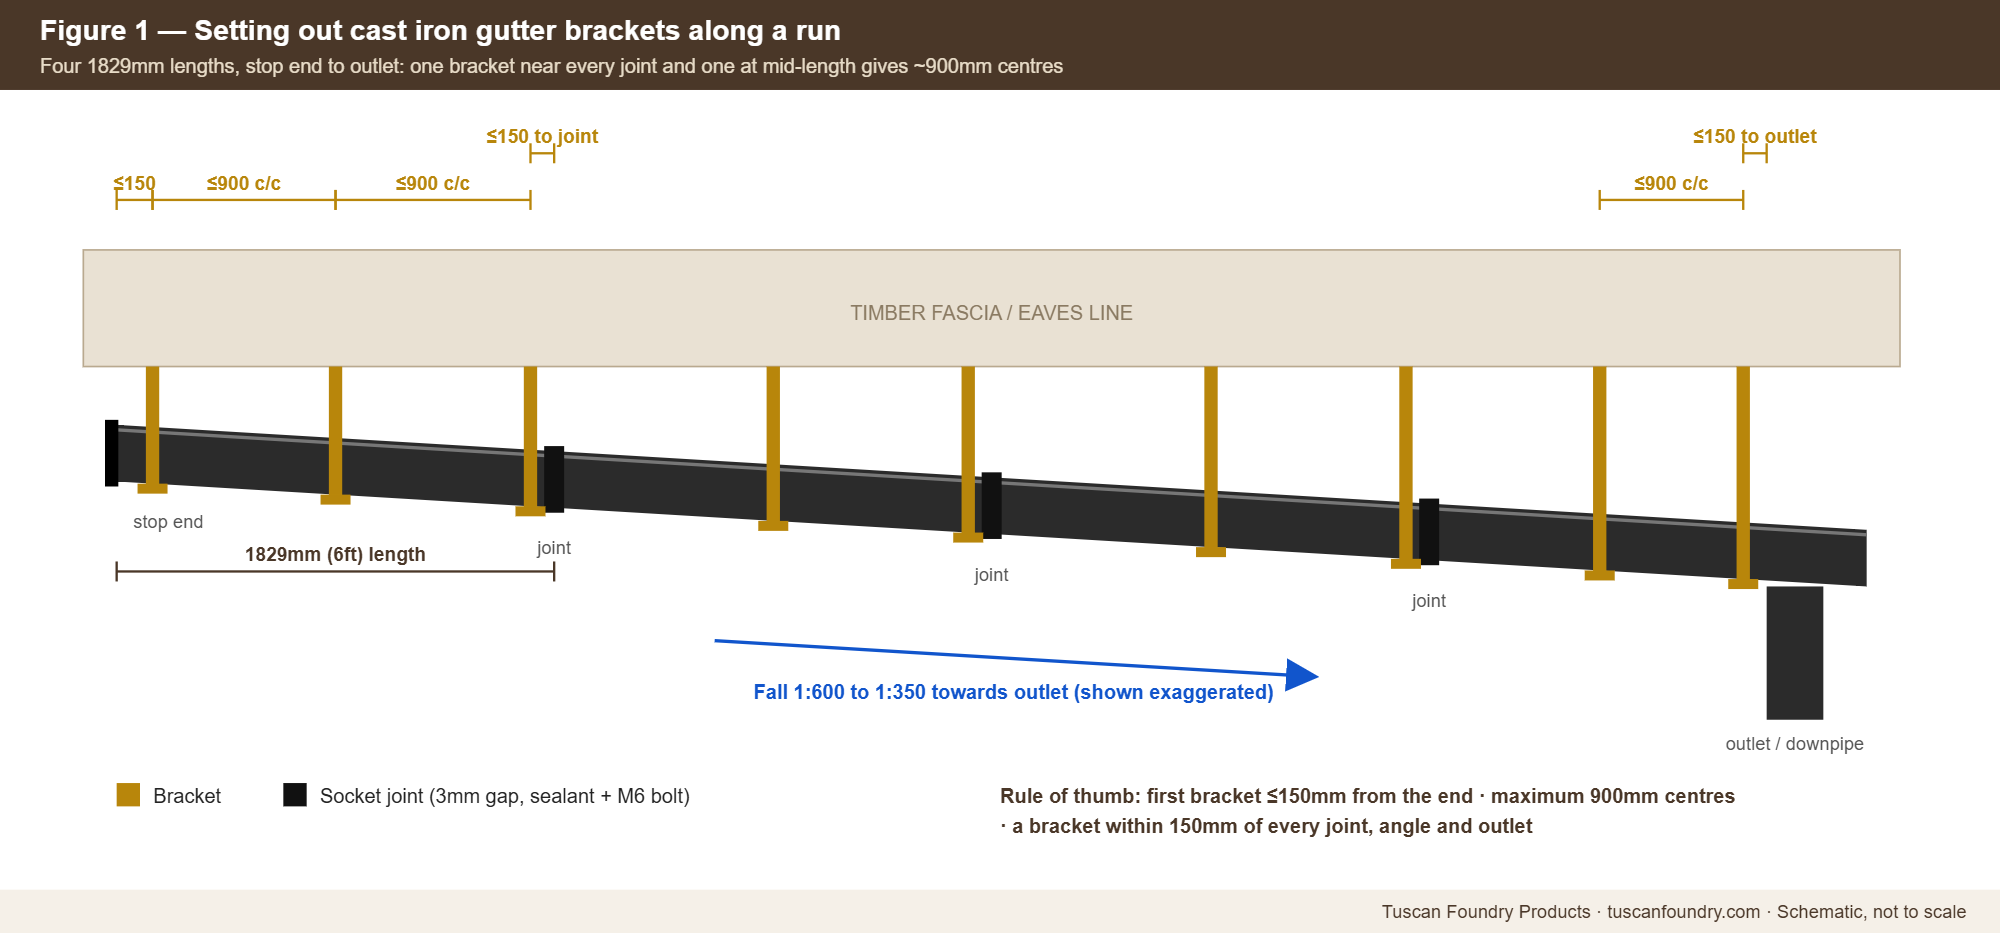
The correct bracket is decided by what the eaves offer as a fixing: a sound timber fascia takes a fascia bracket, exposed or accessible rafter feet take a top-fix or side-fix rafter bracket, and masonry eaves with no timber take a drive-in bracket. The gutter profile then decides the shape of the bracket cup, because brackets are not interchangeable between profiles.
A cast iron half round gutter fascia bracket is screwed to the face of the fascia board and is the simplest bracket to set out, because it can be fixed at any position along the run. It relies entirely on the fascia, so the board must be sound and well fixed to the rafter ends before any cast iron is hung on it. On Ogee profiles, whose flat back can be screwed directly to the fascia, we still recommend fascia brackets beneath the gutter wherever possible; the fascia rise and fall bracket for common Ogee gutter gives both support and adjustment.
A top rafter rise and fall bracket has a long steel arm that is screwed to the top face of the rafter and lies beneath the roof covering. It is very strong — the arm is restrained by the roof itself — and it is the right choice for open eaves and for exposed sites. Its limitations are that the bracket centres follow the rafters, which on older buildings are often at irregular spacings, and that the eaves course of slates or tiles must be lifted to fix it. It is most economical when the roof is being re-covered anyway.
A side rafter rise and fall bracket is screwed to the side of an exposed rafter foot, so it can be fitted without disturbing the roof covering. It is common on cottages, Arts and Crafts houses and agricultural buildings with open eaves and visible sprockets. Where rafters sit at 400–450mm centres, fixing to every second rafter gives centres within the 900mm limit; where they are wider apart, an intermediate fixing will be needed.
Drive-in brackets are the traditional fixing where a gutter is carried directly on a masonry wall with no fascia. A steel spike is driven into a mortar joint — never into the face of a stone or brick — and a cup or cradle carries the gutter. Our Ogee drive-in bracket with understay adds a raking stay fixed back to the wall for extra strength, and we also supply a 340mm galvanised drive-in gutter spike and a drive-in rise and fall bracket for beaded half round gutter. Because the spike positions are dictated by the coursing of the wall, drive-in runs often end up with slightly uneven centres; the 900mm maximum still applies.
Rise and fall brackets are available in fascia, top rafter, side rafter and drive-in forms. Each has a threaded, height-adjustable cup, so the fall can be set at every bracket position without packing or shims. On historic eaves that have settled, twisted or been repaired over two centuries, that adjustment is often the difference between a gutter that drains and one that ponds. Our full range of rise and fall gutter brackets covers plain, deep and beaded half round, common and Notts Ogee and G46 moulded profiles.
A bracket must match the profile and size of the gutter it carries, and brackets from one profile should never be assumed to fit another. A 115mm half round bracket will not properly seat a 115mm beaded half round gutter, and a common Ogee bracket will not carry a Notts Ogee. A poorly seated gutter rocks in its brackets, strains its joints and channels water to the wrong place.
| Gutter profile | Typical sizes | Bracket options |
|---|---|---|
| Plain half round | 100, 115, 125, 150mm | Fascia, top rafter, side rafter, drive-in; rise and fall in each |
| Beaded half round | 100, 115, 125, 150mm | Fascia, top rafter, side rafter, drive-in rise and fall |
| Deep half round | Various deep-flow sizes | Fascia, top rafter, side rafter, drive-in rise and fall |
| Common Ogee (OG) | 100, 115, 125mm | Fascia, top and side rafter, drive-in with understay; screw-fixed through back |
| Notts Ogee | Profile-specific | Fascia and top rafter rise and fall |
| Moulded (e.g. G46) | Profile-specific | Fascia, top and side rafter rise and fall |
Older and regional profiles frequently fall outside standard ranges. Where no stock bracket fits, a bespoke bracket can be made to match.
Proprietary systems have their own bracket patterns too. We have written separately about bespoke brackets for Alumasc Apex Heritage cast iron guttering, and we supply profile-specific brackets such as the G46 moulded gutter fascia rise and fall bracket and the deep half round fascia bracket.
Each bracket should be fixed with corrosion-resistant screws into sound timber or properly plugged masonry, and the gutter joints made with a sealant and a zinc-plated M6 bolt. Brackets are only as strong as what they are fixed to.
On listed buildings, retain and reuse sound historic brackets wherever possible. Check each one for corrosion, cracks, distortion and loose fixings. Where a single bracket has failed in an otherwise sound run, a half round gutter repair bracket provides a new, adjustable fixing point without taking the whole gutter down.
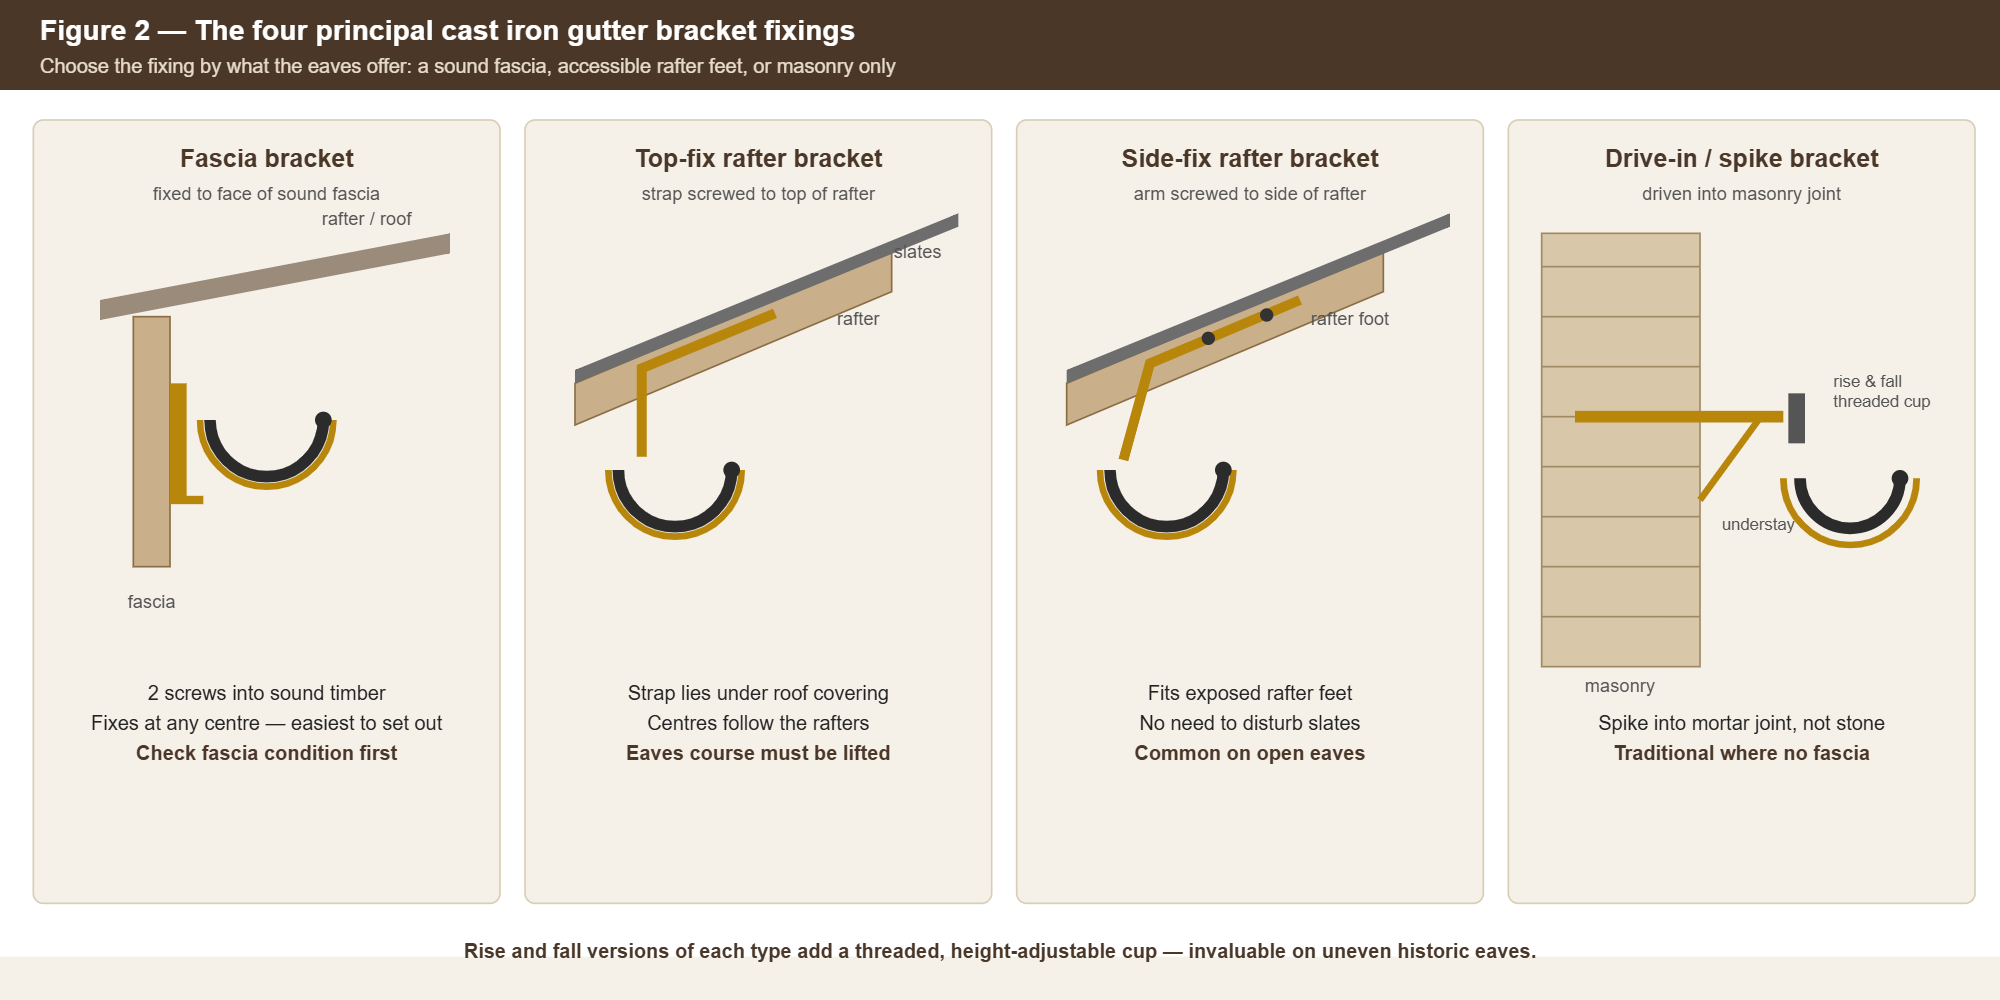
Cast iron downpipes should be fixed at every socket — one fixing per pipe length — which on standard 1829mm lengths gives fixing centres of about 1.83m and never more than 2m. Fixing starts at the top, with the outlet and offset, and works downwards.
A two-storey Victorian house with a 6m drop will typically need four fixings on the straight pipe, plus fixings at the offset and shoe — around six in all.
Most failures we see in cast iron gutter runs come down to too few brackets, brackets in the wrong place, or brackets fixed to something that cannot hold them. The cast iron itself is rarely the cause.
On a listed building, the bracket type, its position and its fixing method are all part of the historic fabric, and changing them — for example, replacing drive-in brackets with a new fascia — may require Listed Building Consent. Like-for-like repair generally does not, but the local conservation officer should be the arbiter. Our listed buildings FAQ covers the consent questions we are asked most often.
Where historic brackets are missing, decorative, or of a pattern no longer made, we can make them to match. Bespoke commissions and copy casting typically take 8–10 weeks, so we advise flagging the requirement early in the programme; standard stock brackets are generally available for prompt despatch, and we will confirm current availability at quotation. Curved runs on bays and turrets need their own bracket set-out, and radius guttering carries a longer lead time of around 12–14 weeks.
For complex roofs, irregular eaves, damaged fixings or sites with difficult access, a chargeable site survey is the most reliable way to establish profiles, bracket patterns and positions before anything is ordered. It protects the project from the costly mismatches that occur when brackets are specified from photographs alone.
The following buildings illustrate how eaves construction, exposure and roof form shape bracket choice and spacing. They are representative examples of the conditions we encounter, not a record of works carried out by Tuscan Foundry.
New Lanark, South Lanarkshire — Category A listed, World Heritage Site
The great mill buildings and workers’ housing of New Lanark sit in a steep, damp gorge of the Clyde, where long eaves runs face heavy rainfall and periodic snow. On buildings of this scale and exposure, the 900mm maximum is a ceiling rather than a target: tighter centres, robust rafter or rhone brackets and a bracket at every joint keep long runs true. Uniform bracket lines along these austere elevations also matter visually, because any sagging section is immediately apparent.
Stack Square, Blaenavon Ironworks, Torfaen — Cadw guardianship site
The ironworkers’ cottages of Stack Square stand on an exposed upland site within the Blaenavon Industrial Landscape World Heritage Site. Simple masonry eaves without fascias are typical of early industrial housing of this kind, making drive-in brackets the historically appropriate fixing. Spikes must be driven into sound lime mortar joints rather than the stone, and bracket centres follow the coursing — so careful set-out is needed to keep every joint within 150mm of support on a wind-swept elevation.
Port Sunlight Village, Wirral — Conservation Area with numerous listed buildings
Port Sunlight’s Arts and Crafts cottages display a wide variety of eaves details, many with exposed rafter feet and deep overhangs. Side-fix rafter brackets suit this construction because they fix to the visible rafters without disturbing the roof covering. With rafters at varying centres, specifiers must check that the chosen fixing positions never exceed 900mm, and add intermediate support where the rafter spacing would otherwise leave a joint unsupported. Rise and fall cups then take up the small level differences between hand-cut rafter feet.
Saltaire, West Yorkshire — Grade II listed terraces, World Heritage Site
Sir Titus Salt’s model village comprises long, continuous stone terraces where every house shares a single eaves line. On terraces like these, consistency is everything: a dip or hump in one property’s gutter breaks the line of the whole street. Rise and fall brackets allow each bracket to be set precisely to a single string line across neighbouring properties, while the masonry eaves call for fixings into sound mortar joints that can be repointed afterwards without disturbing the stonework.
Cragside, Northumberland — Grade I listed, National Trust
Richard Norman Shaw’s Cragside is a picturesque composition of gables, turrets and steep roofs on an exposed northern hillside. Roofs of this complexity produce many short gutter runs, frequent angles and multiple outlets — precisely the conditions where bracket counts rise well above the straight-run average. Every angle needs a bracket within 150mm on each leg, outlets need support on both sides, and snow loading on steep slopes justifies centres well inside 900mm. Counting brackets run by run, rather than by overall length, avoids under-ordering.
Cast iron gutter brackets should be no more than 900mm apart, centre to centre. Manufacturers quote 900mm or 915mm (3ft) centres, which corresponds to a bracket near each joint and one at the middle of each 1829mm length. On exposed or snow-prone sites, and for heavy profiles such as 150mm or deep half round, we recommend tightening centres to around 600–750mm.
A 6m straight run of cast iron gutter typically needs nine brackets: four 1829mm lengths at two brackets per length, plus one. Add one bracket for each angle and two for each running outlet. On an exposed site at about 650mm centres, allow around ten to eleven.
A bracket should be within 150mm of every joint, angle, outlet and stop end. The first bracket at the start of a run is best placed 75–150mm from the end. Running outlets need a bracket on each side, and angles need one on each leg.
Cast iron guttering should fall between 1:600 and 1:350 towards the outlet, which is between 1.7mm and 2.9mm per metre. Over a 9m run that is a drop of roughly 15–26mm. Where the eaves do not allow a consistent fall, a well-maintained level gutter is preferable to one with humps or dips.
Where there is no fascia, use rafter brackets if the rafter feet are accessible, or drive-in brackets driven into the mortar joints of masonry eaves. On a listed building, follow the historic fixing method wherever possible, as changing the bracket type may require Listed Building Consent. Rise and fall versions allow the fall to be set accurately on uneven historic eaves.
Cast iron downpipes should be fixed at every socket, which on standard 1829mm lengths means about 1.83m centres and never more than 2m. Fix through the cast ears on spacers of around 25mm so the wall can dry and the back of the pipe can be painted, and use holderbats where the pipe has no ears.
Yes. Where original brackets are missing, decorative or of a discontinued pattern, we can make them to match from photographs, measured drawings or a surviving sample. Bespoke and copy-cast items typically take 8–10 weeks, and for complex roofs we recommend a chargeable site survey before anything is ordered.
Bracket spacing is one of the simplest parts of a cast iron rainwater specification to get right, and one of the most expensive to get wrong. The technical recommendations are clear: fix brackets at no more than 900mm centres; place a bracket within 150mm of every stop end, joint, angle and outlet; set the gutter to a fall of 1:600 to 1:350; choose the bracket type according to what the eaves can genuinely support; and fix downpipes at every socket on spacers. Tighten the centres on exposed sites and heavy profiles, and on historic buildings retain the original fixing method wherever it remains sound.
At Tuscan Foundry Products we have supplied cast iron rainwater systems to historic buildings since 1893, and we stock fascia, rafter, drive-in and rise and fall brackets for every common profile alongside our cast iron gutters and pipes. Where a building needs something no catalogue carries, our bespoke and copy casting service will match it, typically within 8–10 weeks. Browse our product catalogue, or call us on 0333 987 4452 or contact our team to talk through bracket choice, spacing and set-out for your project.