
Established 1893 | BS 460:2002 Certified | UK & International Supply | Expert Technical Support | 0333 987 4452
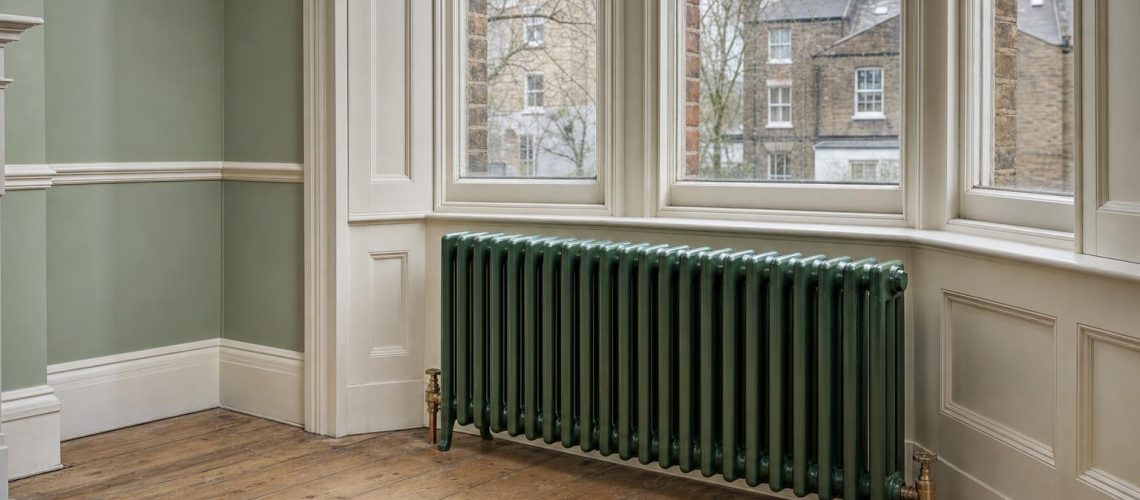
A step-by-step method for architects, heating designers, conservation officers and owners of Georgian, Victorian and Edwardian houses: from room heat loss and BS EN 442 outputs to section counts, lengths, heat pump correction factors and choosing the right radiator pattern for the building.
Technical summary. To size a cast iron radiator for a period room, start with a room-by-room heat loss calculation, then divide the room’s heat loss by the radiator’s output per section and round up. Outputs are tested to BS EN 442 at ΔT50, which suits a conventional boiler; for a heat pump, multiply the output by a correction factor first (0.748 at ΔT40, 0.515 at ΔT30). Length is the number of sections multiplied by the section width, plus 24mm or 26mm for the reducing bushes. Check that length against the wall or window, the height against window boards and dado rails, and the depth against the space available. Then choose the pattern that suits the building: plain columns for most Victorian and Edwardian rooms, Board School patterns for institutional buildings, and ornate patterns for principal rooms.
Cast iron radiators are often chosen for how they look and then sized as an afterthought. In a period room that order is backwards. The right way to size and choose a cast iron radiator is to work from the room’s calculated heat loss to a section count, check the resulting length, height and depth against the room, and only then choose the pattern that suits the building’s date and character. Get the sequence right and the radiator heats the room, sits properly beneath the window and looks as though it has always been there.
This guide is written for architects, heating designers, conservation officers and owners of Georgian, Victorian and Edwardian houses. It sets out the method we use when we prepare a radiator schedule, explains what the published output figures mean and how they change at heat pump temperatures, and gives worked examples with the arithmetic shown in full.
Mistakes usually happen in one of three places: a radiator sized from a rule of thumb rather than a heat loss figure, a length that ignores manufacturing tolerance, or a heat pump conversion where boiler-temperature outputs are used without correction. Each is avoidable, and each is expensive to put right once pipework is set and floors and plaster are finished. Our full range is on the cast iron radiators pages of our website.
A radiator in a period room is part of the interior, not just part of the heating system. Well chosen, a cast iron radiator reads as belonging to the building; poorly chosen, it fouls a shutter, overhangs a window board or looks too modern for the room.
Sectional cast iron radiators came into British buildings in the second half of the nineteenth century with low-pressure hot water heating. They were common in schools, chapels, institutions and larger houses well before they were common in ordinary homes, which is why patterns such as the rounded-top Board School radiator are so closely associated with public buildings built after 1870.
Georgian houses predate central heating altogether. Any radiator in a Georgian room is a later addition, so the choice is about restraint: a plain pattern, a modest height, a position that respects the joinery, and a finish that lets it recede. In Victorian and Edwardian houses the radiator can be more confidently part of the room, and an ornate pattern may be entirely appropriate in a drawing room or on a principal staircase.
There is also a practical reason cast iron suits these buildings. Its thermal mass means a radiator warms up slowly and keeps giving heat after the system has cycled off, which suits solid-walled houses and the long, steady running that heat pumps prefer. We explain the material in more detail in our guide to cast iron as a building material.
Every radiator schedule should start from a room-by-room heat loss calculation, expressed in watts. It is the only reliable basis for deciding how many sections each room needs.
The calculation is normally carried out by a heating designer, usually to BS EN 12831. It accounts for the construction of each wall, window, floor and ceiling, the room’s volume, the design outside temperature and the rate of air change. In period houses these factors vary more than in modern construction: solid brick or stone walls, single-glazed sashes, suspended timber floors, open flues and tall ceilings all increase heat loss, and two rooms of the same floor area can need very different outputs.
Rules of thumb based on floor area are the most common source of under-sized radiators in old houses, because they take no account of ceiling height or construction. If a project does not yet have heat loss figures, we can arrange a site survey to gather the room dimensions and construction details needed to produce them. On complex or sensitive buildings, a survey before the specification is fixed protects the outcome.
Ask your heating designer for three things for each room: the design heat loss in watts, the design room temperature, and the flow and return temperatures the system will run at. With those, sizing becomes simple arithmetic.
Cast iron radiator outputs are tested to BS EN 442 and published at ΔT50: the difference between the mean water temperature in the radiator and the room air temperature. At any other ΔT, the output must be corrected before sizing.
ΔT50 corresponds to about 70°C mean water in a 20°C room, typical of a conventional boiler running at 75/65°C. Condensing boilers run more efficiently at lower return temperatures, and heat pumps run lower still, typically between ΔT30 and ΔT40. Radiator output falls faster than the temperature difference does, so the correction is not proportional. We use factors based on an averaged radiator exponent of n = 1.30:
| Design ΔT | Approx. mean water temp (20°C room) | Correction factor | Victorian 636mm section |
|---|---|---|---|
| ΔT50 | 70°C | 1.000 | 75.4W |
| ΔT45 | 65°C | 0.872 | 65.7W |
| ΔT40 | 60°C | 0.748 | 56.4W |
| ΔT35 | 55°C | 0.629 | 47.4W |
| ΔT30 | 50°C | 0.515 | 38.8W |
Table 1. Correction factors (n = 1.30) applied to the 636mm Victorian 4-column section. Multiply the ΔT50 output by the factor for your design ΔT.
The factors are averaged across the range. For a formal schedule we can supply model-specific figures, which matter most at low temperatures and on large projects where small differences accumulate across many rooms.
Divide the room’s heat loss by the corrected output per section and round up to the next whole section. Then calculate the length: number of sections multiplied by section width, plus the bush allowance for the pattern.
The sizing formulas
Sections = room heat loss (W) ÷ output per section at design ΔT (W), rounded up
Length (mm) = sections × section width + bush allowance
Bush allowance: 24mm for Victorian, Nouveau, Powis and Tredegar; 26mm for Edwardian and Board School
Always round up, never down. A radiator a fraction of a section short will not hold the design temperature on the coldest days, and in a period house those are the days when it matters. Where the rounding adds a large margin, check whether a lower height with more sections fits the room better.
Cast iron sections are sand cast, and we allow a manufacturing tolerance of ±2mm per section. On a 20-section radiator that is up to 40mm either way in the worst case. Do not set pipework until the radiator has arrived on site. Measure the delivered radiator, then set the valve tails. This one rule avoids most of the remedial work we see on radiator installations.
Radiators are factory-built and pressure tested up to a limit of between 10 and 20 sections, depending on the model and height. Longer radiators are supplied in factory-built lengths and joined on site with a joining key. This affects installation planning, so the schedule should flag any radiator that exceeds its factory-built limit.
| Pattern | Section width | Bush allowance | Factory-built up to |
|---|---|---|---|
| Victorian 4-column | 50mm (353/485/636) · 55mm (785/935) | 24mm | 20 sections (17 at 935mm) |
| Edwardian 2-column | 60mm | 26mm | 20 sections (17 at 1040mm) |
| Edwardian 6-column | 60mm | 26mm | 10–17 sections by height |
| Board School 2- and 3-column | 80mm | 26mm | 10–15 sections by height |
| Nouveau | 76mm | 24mm | 15 sections |
| Powis | 76mm | 24mm | 15 sections |
| Tredegar | 78mm | 24mm | 15 sections |
Table 2. Section widths, bush allowances and factory-built limits across the range.
Choose a height that clears the window board, sits below any dado rail and leaves room for valves and cleaning. In most period rooms the height is set by the window, not by output.
The traditional position for a radiator is beneath a window, where it counters the downdraught from cold glass. Its top should sit below the window board with enough clearance for warm air to rise freely and for shutters, shutter boxes and window seats to work. In rooms with low sills, which are common in Georgian and Regency houses and in bay windows, that usually means one of the lower heights: 353mm or 485mm in the Victorian 4-column, or 490mm in the Edwardian 2-column.
Dado rails set the second limit. A radiator that rises above or through a dado rail looks wrong in almost every period interior. The lower Nouveau heights were designed to sit beneath a dado. On a pier between windows, or on a stair wall where there is no sill, a taller radiator gives more output for less wall length.
Lower heights need more sections for the same output, and so more length. If the length needed at a low height exceeds the width of the window, consider a deeper pattern at the same height, or split the output between two radiators.
Remember that wall-hung versions sit higher off the floor than floor-standing ones of the same nominal size. The Victorian 4-column, for example, is 65mm lower when wall-hung, because the feet are omitted; check the overall height and the clearance to the floor for the version you are specifying.
Depth, or projection from the wall, sets how much output a radiator gives for each millimetre of length. Deeper radiators give more heat from a shorter length; shallower ones keep halls and passages clear.
| Pattern | Depth | Typical use |
|---|---|---|
| Edwardian 2-column | 70mm | Halls, passages, window reveals |
| Victorian 4-column | 140mm | General use in most rooms |
| Board School 2-column | 180mm | Schools, chapels, village halls |
| Board School 3-column | 200mm | Larger institutional rooms |
| Nouveau | 203mm | Victorian reception rooms |
| Powis | 214mm | Drawing rooms, libraries, staircases |
| Edwardian 6-column | 221mm | Maximum output, heat pump systems |
| Tredegar | 250mm | Large, high-ceilinged rooms |
Table 3. Radiator depth (projection) by pattern, shallowest first.
In a narrow hall, a deep radiator narrows the passage and catches coats and bags. In a large drawing room, depth is rarely a constraint and a deep pattern keeps the radiator to a sensible length. Allow for the valves, which add to the overall width at each end, and for skirting boards, which may push a wall-mounted radiator further forward.
Choose the pattern to suit the date, status and use of the room. Plain column radiators suit most Victorian and Edwardian rooms and are the safest choice for Georgian interiors; Board School patterns suit institutional buildings; ornate patterns belong in principal rooms.
| Pattern | Heights (mm) | Section | Depth | Output per section, ΔT50 |
|---|---|---|---|---|
| Victorian 4-column | 353, 485, 636, 785, 935 | 50/55mm | 140mm | 40.8, 58.2, 75.4, 98.3, 116.4W |
| Edwardian 2-column | 490, 640, 740, 1040 | 60mm | 70mm | 41, 46, 62, 74W |
| Edwardian 6-column | 485, 660, 760, 960 | 60mm | 221mm | 95.3, 133, 151, 197W |
| Board School 2-column | 520, 620, 720, 920 | 80mm | 180mm | 86, 103, 124, 161W |
| Board School 3-column | 520, 620, 720, 920 | 80mm | 200mm | 97, 119, 138, 176W |
| Nouveau | 510, 660, 760, 954 | 76mm | 203mm | 74, 111, 121, 151W |
| Powis | 838 | 76mm | 214mm | 136W |
| Tredegar | 760 | 78mm | 250mm | 180W |
Table 4. The range at a glance. Outputs tested to BS EN 442 at ΔT50; heights and outputs listed in the same order.
Square-edged columns and a plain face make the Victorian 4-column the most widely useful radiator for Victorian and Edwardian houses. It is also the pattern we suggest most often where a conservation officer wants a plain, unobtrusive emitter, including in Georgian rooms. Five heights from 353mm to 935mm cover everything from a low bay sill to a tall pier, and the 140mm depth suits most rooms.
The Edwardian 2-column is the slimmest radiator in the range at 70mm deep, and the natural choice for halls, passages and window reveals. The Edwardian 6-column is its opposite: at 221mm deep it gives the highest output per metre of wall among the plain patterns, which makes it the first choice where wall space is limited or a heat pump is planned.
Rounded tops and crisp line detail give the Board School patterns their institutional character. They suit schools, chapels and village halls, and the conversions of those buildings to homes and offices. The 2-column is 180mm deep and the 3-column 200mm, both with 80mm sections. We discuss heating and rainwater work in places of worship on our churches and ecclesiastical buildings page.
Scrolled relief on every section and Victorian proportions make the Nouveau radiator a radiator to show rather than hide. It suits Victorian reception rooms, and the 510mm and 660mm heights sit comfortably beneath a dado rail. With 76mm sections and a 203mm depth, it gives good output for its length.
Our two most ornate patterns are both named after historic Welsh houses. The Powis, named after Powis Castle, is a richly scrolled two-column radiator 838mm high, for drawing rooms, libraries and principal staircases. The Tredegar, named after Tredegar House in Newport, is an ornate three-column pattern 760mm high whose extra column gives 180W per section, more than any other decorative pattern in the range. It suits large, high-ceilinged rooms where a plain radiator would look undersized.
The three examples below show the full method, from heat loss to section count, length and fixing. Each is shown at boiler temperature and again at a heat pump temperature, because that comparison is where most sizing errors arise.
Heat loss 1,400W. Low sill in the bay, so the Victorian 4-column at 636mm high is chosen, floor-standing.
| Step | Boiler (ΔT50) | Heat pump (ΔT40) |
|---|---|---|
| Output per section | 75.4W | 75.4 × 0.748 = 56.4W |
| Sections needed | 1,400 ÷ 75.4 = 18.57 → 19 | 1,400 ÷ 56.4 = 24.82 → 25 |
| Length | 19 × 50 + 24 = 974mm | 25 × 50 + 24 = 1,274mm |
| Output delivered | 19 × 75.4 = 1,433W | 25 × 56.4 = 1,410W |
| Feet | 2 | 3 (odd length, 21–39 sections) |
| Factory-built? | Yes (limit 20) | No: joined on site from factory-built lengths |
Table 5. Example 1 worked at boiler and heat pump temperatures.
At boiler temperature, 974mm sits comfortably within most bay windows. At ΔT40 the radiator grows by 300mm. If 1,274mm will not fit, the alternatives are a deeper pattern or two radiators. An Edwardian 6-column at 485mm gives 95.3 × 0.748 = 71.3W per section, so 1,400 ÷ 71.3 = 19.6, rounded up to 20 sections: 20 × 60 + 26 = 1,226mm, delivering 1,426W, at 221mm deep. Only a little shorter, which shows why a heat pump conversion sometimes means a second radiator rather than a longer one.
Heat loss 900W. A narrow hall, so projection matters most: the Edwardian 2-column at 740mm high, 70mm deep.
| Step | Boiler (ΔT50) | Heat pump (ΔT40) |
|---|---|---|
| Output per section | 62W | 62 × 0.748 = 46.4W |
| Sections needed | 900 ÷ 62 = 14.52 → 15 | 900 ÷ 46.4 = 19.41 → 20 |
| Length | 15 × 60 + 26 = 926mm | 20 × 60 + 26 = 1,226mm |
| Output delivered | 15 × 62 = 930W | 20 × 46.4 = 928W |
| Fixing | 2 feet, or 4 brackets if wall-mounted | 2 feet, or 6 brackets if wall-mounted |
| Factory-built? | Yes (limit 20) | Yes (limit 20) |
Table 6. Example 2 worked at boiler and heat pump temperatures.
Heat loss 2,500W. A large principal room that calls for an ornate pattern: the Tredegar at 760mm high.
| Step | Boiler (ΔT50) | Heat pump (ΔT45) |
|---|---|---|
| Output per section | 180W | 180 × 0.872 = 157.0W |
| Sections needed | 2,500 ÷ 180 = 13.89 → 14 | 2,500 ÷ 157.0 = 15.93 → 16 |
| Length | 14 × 78 + 24 = 1,116mm | 16 × 78 + 24 = 1,272mm |
| Output delivered | 14 × 180 = 2,520W | 16 × 157.0 = 2,511W |
| Feet | 2 | 2 |
| Factory-built? | Yes (limit 15) | No: joined on site from factory-built lengths |
Table 7. Example 3 worked at boiler and heat pump temperatures.
In a room of this size, a 2,500W heat loss may be better split between two radiators, one under each window, for more even heat. The arithmetic is the same: divide the heat loss between the positions and size each radiator separately.
A heat pump needs more radiator surface than a boiler for the same room, because it runs at lower water temperatures. At ΔT40 a section gives about three-quarters of its ΔT50 output; at ΔT30, about half.
That has three consequences for a period house. First, the radiator schedule must be prepared at the heat pump’s design temperature from the outset, not converted from a boiler schedule afterwards. Second, lengths increase, so window widths and wall space need checking again. Third, deeper patterns such as the Edwardian 6-column become more attractive, because they recover output without adding length.
Fabric improvements change the picture. Secondary glazing, draught-proofing and loft insulation can reduce a room’s heat loss, and with it the radiator size, but only if the heat loss calculation reflects the improvements that will actually be made. Cast iron’s thermal mass is an advantage here: heat pumps run for long periods at steady output, and a heavy radiator smooths the heat delivered to the room. Our schedules show outputs at both boiler and heat pump temperatures, so a design team can see the effect of a future conversion before radiators are bought.
Floor-standing radiators stand on integrated feet, with wall ties for stability; wall-mounted versions hang on brackets. The number of feet or brackets depends on the number of sections.
| Sections | Floor-standing: integrated feet | Sections | Wall-mounted: brackets |
|---|---|---|---|
| Up to 20 | 2 | Up to 17 | 4 |
| 21–39 (odd) | 3 | 18–31 | 6 |
| 22–40 (even) | 4 | 32–40 | 8 |
Table 8. Feet and brackets by section count. Floor-standing radiators are also supplied with wall ties.
Floor-standing is the traditional arrangement and suits most period rooms. A full radiator is heavy, so check that a suspended timber floor can carry the load at the feet, particularly on long radiators and upper floors. Wall-mounting suits rooms with fragile or uneven floors, or where a floor finish should run unbroken beneath the radiator, but the wall must be able to take the brackets. In lath and plaster or soft brick, fixings need to reach sound masonry or a suitable timber ground.
Radiators can be supplied in primer for painting on site, in a factory colour, in a special-effect finish, or colour-matched to a paint reference. Valves should be traditional angled sets that suit the radiator and the room.
| Finish | What it offers | Typical lead time |
|---|---|---|
| Primer | Ready for painting on site, for example with the room’s joinery | About 1 week |
| Factory colour | 20 standard colours | 2–3 weeks |
| Special effects | 7 special-effect finishes | 2–3 weeks |
| Colour match | Matched to a paint reference or conservation colour scheme | 2–3 weeks |
Table 9. Finishes and typical lead times. We confirm the lead time when we quote.
In conservation work, primer for site painting is often the most flexible option: the decorator can match the radiator to the walls or joinery in the same paint system, and the radiator can be repainted with the room in future. A colour-matched factory finish suits projects where site painting is impractical.
For valves, we supply Kentwell and Chartwell traditional angled valve sets, in manual and thermostatic versions, for 15mm copper pipe. Choose a valve finish that relates to the room’s door and window furniture. Whatever the radiator, the system must be flushed and dosed with a corrosion inhibitor in line with BS 7593.
Installing or replacing radiators in a listed building may need listed building consent, particularly where original radiators, pipe runs or historic fabric are affected. Consult the local conservation officer early, before positions and pipe routes are fixed.
Pipe routes usually matter more to a conservation officer than the radiators themselves. Notching joists, lifting historic floorboards and chasing original plaster are all interventions that need justification. A proposal that shows radiator positions, pipe routes and a plain, reversible radiator pattern is easier to assess than one that leaves those details to site. Where original radiators survive, consider retaining and reinstating them before specifying new ones.
In England, consent is administered by the local planning authority with guidance from Historic England; in Wales, Cadw provides the equivalent guidance; in Scotland, Historic Environment Scotland. Many of the principles in our listed building questions page for rainwater goods apply equally to heating: like-for-like where possible, minimum intervention, and early conversation. We can provide drawings, technical data and specification wording to support an application, and our wider approach to heritage buildings follows the same principles.
Model specification clause
Radiators: cast iron sectional column radiators by Tuscan Foundry Products, [pattern], [height]mm high, [number] sections, [floor-standing on integrated feet / wall-mounted on brackets]. Output not less than [ ]W at ΔT[ ] to BS EN 442. Finish: [primer for site painting / factory colour / colour-matched to [reference]]. Valves: [Kentwell / Chartwell] angled [thermostatic / manual] and lockshield set, [finish]. System to be flushed and inhibited to BS 7593. Pipework not to be set until radiators are delivered and measured.
To prepare a radiator schedule, we need room-by-room heat losses and a few dimensions for each position. With those, we return the model, section count, length and output at boiler and heat pump temperatures for every room.
Ask us for a radiator schedule through our contact page, or call 0333 987 4452. If heat losses are not yet available, a site survey visit gathers the information needed.
Most radiator problems in period houses come from a short list of avoidable errors in sizing, measurement and sequencing.
The following are representative examples of how the method applies in different buildings. They illustrate typical constraints rather than describing specific Tuscan Foundry contracts.
Grade II Georgian townhouse, Bath
A five-storey terrace with tall sashes and working panelled shutters had never had radiators in its principal rooms. The conservation officer wanted emitters that were plain, reversible and kept clear of the shutter boxes. Low Victorian 4-column radiators at 485mm sat beneath the window boards without fouling the shutters, colour-matched to the joinery so they read as part of the panelling. Pipe routes ran beneath lifted floorboards rather than chased into original lime plaster, and were agreed as part of the consent.
Victorian villa, Cardiff
A double-fronted 1880s villa moving from an oil boiler to an air source heat pump needed its radiators re-sized at a lower flow temperature. A schedule was prepared at both ΔT50 and ΔT40 from the heating designer’s room heat losses. The front reception rooms kept a decorative character with Nouveau radiators beneath the bay windows, while the rear kitchen and back bedrooms took deeper Edwardian 6-column radiators, where output per metre of wall mattered more than ornament.
Former board school, West Yorkshire
A late-Victorian board school converted to apartments retained its tall classroom windows and high ceilings. The design team wanted heating that recalled the building’s institutional past rather than a domestic interior. Board School 3-column radiators, with their rounded tops, were set beneath the long window runs in the former classrooms. Because the rooms were large, several radiators were joined on site from factory-built lengths, with pipework set only after the radiators had been delivered and measured.
Nonconformist chapel, Powys
A Grade II chapel used for worship and community events needed heat along both side walls without visual clutter. Board School 2-column radiators were chosen for their plain, rounded-top form, which suits ecclesiastical and village-hall interiors. Wall-mounting on brackets kept the floor clear for cleaning around fixed pews and avoided bearing on a fragile suspended timber floor. The trustees specified a factory colour close to the existing woodwork, keeping the radiators recessive.
Edwardian semi-detached house, Edinburgh
A long, narrow entrance hall with a staircase rising from it needed heat without narrowing the passage. At 70mm deep, an Edwardian 2-column radiator at 740mm high fitted the wall between the front door and the stair foot, sized from the hall’s calculated heat loss. A second, taller radiator heated the half-landing. Kentwell angled valves in antique brass matched the original door furniture, and the radiators were supplied in primer for painting with the hall joinery.
| Question | Answer |
|---|---|
| How do I work out how many sections a cast iron radiator needs? | Divide the room’s design heat loss in watts by the output per section of your chosen model at your system’s ΔT, then round up to the next whole section. For example, a 1,400W room with a 75.4W section needs 18.57 sections, so 19. |
| What does ΔT50 mean on a radiator output figure? | ΔT50 is the difference between the mean water temperature in the radiator and the room air temperature. BS EN 442 outputs are quoted at ΔT50, which equates to roughly 70°C mean water in a 20°C room, typical of a conventional boiler running at 75/65°C. |
| How do I calculate the length of a cast iron column radiator? | Multiply the number of sections by the section width and add the bush allowance: 24mm for Victorian, Nouveau, Powis and Tredegar patterns, and 26mm for Edwardian and Board School patterns. Allow a manufacturing tolerance of ±2mm per section. |
| Will cast iron radiators work with a heat pump in an old house? | Yes, provided they are sized for the lower water temperature. At ΔT40 a section gives about 75% of its ΔT50 output and at ΔT30 about half, so a heat pump system usually needs more sections or deeper radiators than a boiler system for the same room. |
| What correction factor should I use for a heat pump running at a 50°C mean water temperature? | In a 20°C room, a 50°C mean water temperature is ΔT30, so multiply the ΔT50 output by 0.515. The factors we use, based on a radiator exponent of 1.30, are 0.872 at ΔT45, 0.748 at ΔT40, 0.629 at ΔT35 and 0.515 at ΔT30. |
| Can I size a radiator from the room’s floor area instead of a heat loss calculation? | We do not recommend it. Floor-area rules ignore ceiling height, solid walls, single glazing, suspended floors and air leakage, all of which vary widely in period houses. A room-by-room heat loss calculation is the only reliable basis for a radiator schedule. |
| Which cast iron radiator is most suitable for a Victorian house? | The plain Victorian 4-column is the most widely suitable: square-edged, unornamented and available in five heights from 353mm to 935mm. For principal reception rooms, the Nouveau pattern with scrolled relief suits Victorian proportions well. |
| What is the slimmest cast iron radiator for a narrow hall or passage? | The Edwardian 2-column is 70mm deep, the slimmest in our range. It is made in heights of 490, 640, 740 and 1040mm, which makes it suitable for halls, passages and window reveals where projection matters. |
| Which cast iron radiator gives the most heat for its length? | The Edwardian 6-column, at 221mm deep, gives the highest output per metre of wall of the plain column patterns, up to 197W per section at ΔT50. Among the decorative patterns, the Tredegar gives 180W per section. |
| Should a cast iron radiator be floor-standing or wall-mounted? | Floor-standing is traditional and suits most period rooms; it uses integrated feet with wall ties for stability. Wall-mounting suits rooms with uneven or fragile floors, or where the floor finish should run beneath the radiator. Check that a wall-hung version is available for the model. |
| How many feet or brackets does a cast iron radiator have? | Floor-standing radiators have two feet up to 20 sections, three for odd lengths of 21–39 sections and four for even lengths of 22–40. Wall-mounted versions use four brackets up to 17 sections, six for 18–31 and eight for 32–40. |
| Do I need listed building consent to install cast iron radiators in a listed building? | You may. Replacing or adding radiators can need listed building consent, particularly where original radiators, pipe runs or historic fabric are affected. Speak to the local conservation officer early, before pipe routes and positions are fixed. |
| How long does it take to get a cast iron radiator? | Radiators supplied in primer for painting on site take about one week. Radiators in a factory colour, a special-effect finish or a colour-matched finish take about two to three weeks. We confirm the lead time when we quote. |
| Can cast iron radiators be painted to match a conservation colour scheme? | Yes. Radiators can be supplied in primer for site painting, in one of 20 factory colours, in one of 7 special-effect finishes, or colour-matched to a paint reference such as the joinery or a conservation colour scheme. |
| Why should pipework not be set before the radiator arrives? | Each cast iron section has a manufacturing tolerance of ±2mm, so a long radiator can differ noticeably from its nominal length. Setting tails only once the radiator is on site avoids having to re-run pipework or chase finished plaster. |
| Can Tuscan Foundry tell me which radiators I need for each room? | Yes. Send us room-by-room heat losses and ask us for a radiator schedule. We return the model, section count, length and output at both boiler and heat pump temperatures for each room. If you do not have heat losses, we can arrange a site survey. |
Sizing a cast iron radiator for a period room is straightforward once the sequence is right. Start with a room-by-room heat loss calculation. Correct the BS EN 442 output for your system’s ΔT, using 0.872, 0.748, 0.629 or 0.515 for heat pump temperatures. Divide and round up. Add the bush allowance to find the length, and do not set pipework until the radiator has arrived. Check height against the window board and dado rail, and depth against the space. Only then choose the pattern, matching it to the building’s date, status and use.
For most Victorian and Edwardian rooms, and for Georgian interiors where restraint matters, the plain Victorian 4-column or Edwardian 2-column is the right starting point. The Edwardian 6-column recovers output for heat pumps and tight walls; the Board School patterns suit institutional buildings; and the Nouveau, Powis and Tredegar belong in principal rooms.
Tuscan Foundry Products has supplied cast iron for historic buildings since 1893, from our base in Builth Wells, Powys. For period homes and larger heritage projects alike, ask us for a radiator schedule, a site survey, specification wording or download our 2026 specification guide (PDF). Call 0333 987 4452 or contact our team, and browse the full range of cast iron radiators online.